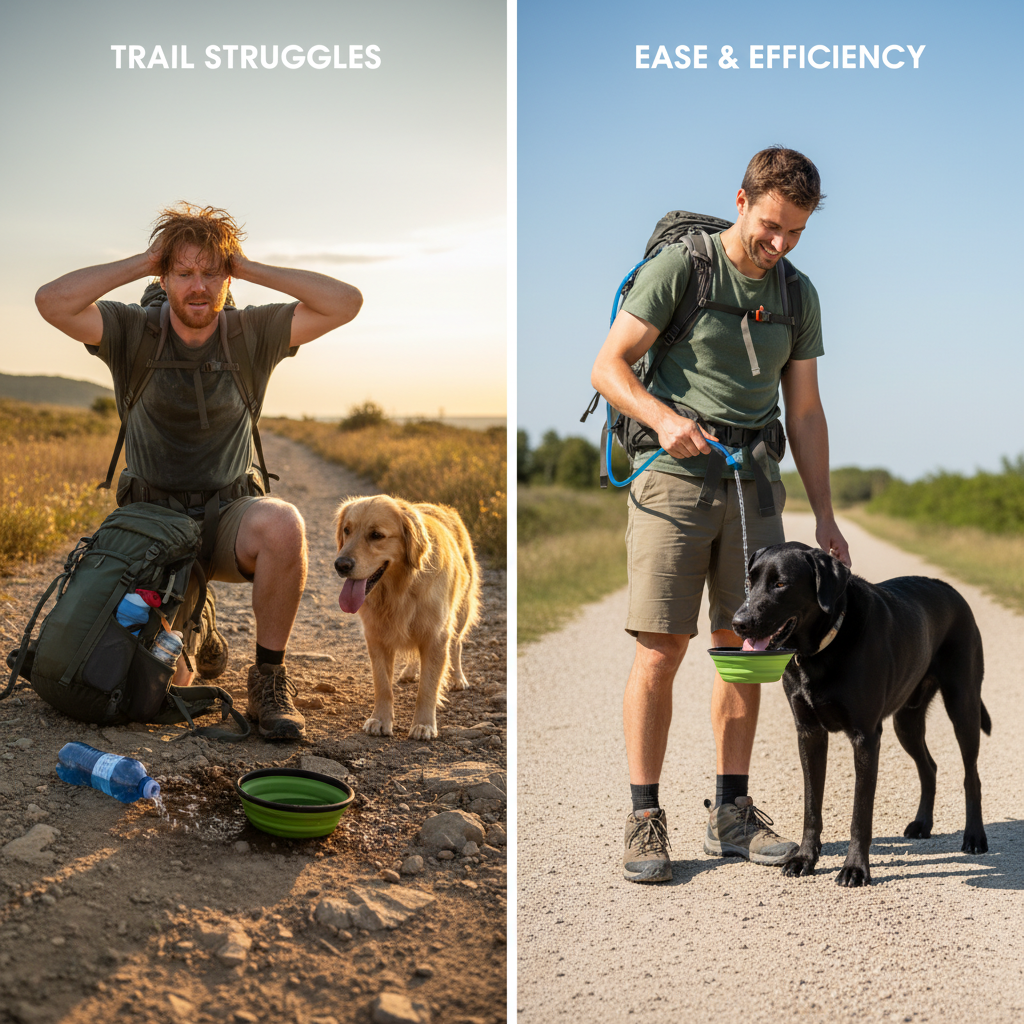
There’s nothing better than hitting the trails with your four-legged best friend. The fresh air, the beautiful scenery, the shared adventure… it’s the best! But let’s be honest, juggling all the gear can sometimes be a hassle. You stop, take off your pack, dig out the water bottle, find the collapsible bowl, pour the water (spilling half of it, of course), and then pack it all away again. By the time you’re done, your momentum is gone.
What if I told you there’s a better way? A way to keep your pup hydrated on the go without stopping, without extra bowls, and without the fuss? Welcome to the ultimate hiking hack: teaching your dog to drink directly from your hydration pack bladder. It’s a game-changer that streamlines your hiking routine and ensures your dog gets quick, easy access to fresh water whenever they need it. In this guide, we’ll walk you through everything you need to know, from the gear you’ll need to a foolproof, step-by-step training plan. Let’s get started!
Why This Hack is a Game-Changer for Hiking Pups
Before we dive into the ‘how,’ let’s talk about the ‘why.’ Switching from the traditional bottle-and-bowl method to a shared hydration pack isn’t just a cool party trick; it offers some serious practical benefits for both you and your dog.
Convenience is King
This is the most obvious perk. Imagine this: your dog is panting a bit, and you want to offer a quick drink. Instead of a 5-minute production of stopping and unpacking, you simply grab the hose from your shoulder strap, give it a squeeze, and let them drink. It’s fast, efficient, and keeps you moving. This means more time enjoying the hike and less time managing gear.
Encourages Better Hydration
Because it’s so easy to offer water, you’re likely to do it more often. Instead of waiting for a designated water break, you can offer your dog small sips every 15-20 minutes. This proactive approach to hydration is much healthier for your dog, helping to prevent dehydration and heat exhaustion before they even start. A constantly hydrated dog is a happier, more energetic hiking companion.
Lighter Pack, Happier Back
While you still need to carry the same amount of water, you get to ditch the clunky, often-wet collapsible bowl. It might not seem like much, but every ounce and every bit of saved space in your pack counts, especially on longer treks. It’s one less piece of gear to remember, pack, and clean later.
Expert Tip: Many dogs prefer the cool, fresh water flowing from a hydration bladder over water that’s been sitting in a warm plastic bowl. The novelty and ease can often encourage picky drinkers to hydrate more regularly on the trail.
Gear Up: Everything You’ll Need for Success
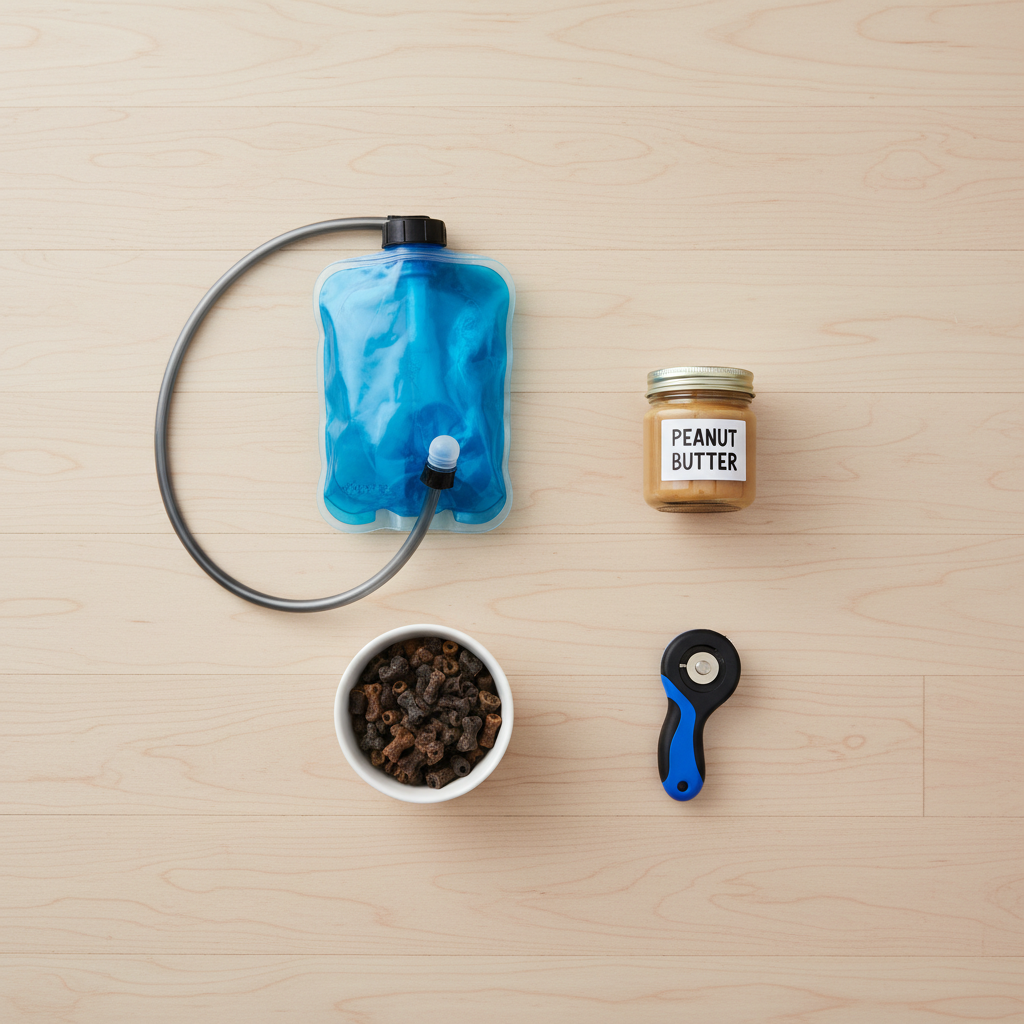
The beauty of this training method is its simplicity. You don’t need a ton of specialized, expensive equipment. In fact, you probably have most of what you need already. Here’s a quick checklist to get you started:
- A Hydration Pack or Bladder: Any standard hydration bladder from brands like CamelBak, Osprey, or Platypus will work perfectly. You don’t need a dog-specific one. The key component is the bite valve, which releases water when pressure is applied.
- High-Value Training Treats: This is crucial for creating a positive association. Choose something your dog absolutely loves and that they don’t get all the time. Think small, soft, smelly treats like bits of freeze-dried liver, cheese, or hot dog. You want to make this training session feel like the best game ever.
- A Clicker (Optional): If your dog is already clicker-trained, this is a fantastic tool to use. The clicker allows you to mark the exact moment your dog interacts correctly with the hose, making your communication crystal clear. If not, don’t worry—a happy, enthusiastic “Yes!” works just as well.
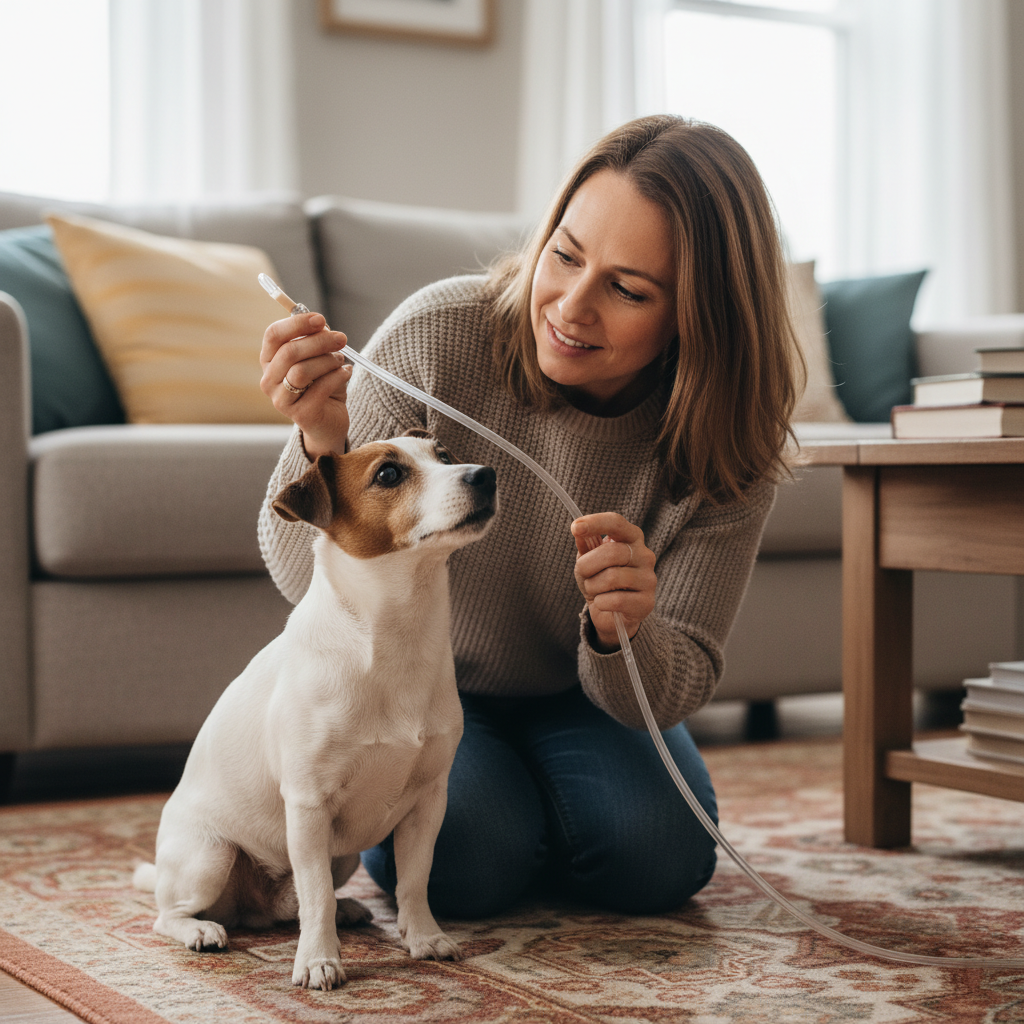
- A Quiet, Low-Distraction Environment: Start your training indoors, like in your living room or kitchen. You want your dog to be able to focus on the new skill without being distracted by squirrels, other dogs, or interesting smells.
- A Smear of Something Lickable (Optional): For the later stages of training, having a tiny bit of dog-safe peanut butter, cream cheese, or meat-flavored baby food can be a secret weapon to encourage your dog to interact with the bite valve.
That’s it! Once you’ve gathered your simple toolkit, you’re ready to start the fun part: the training.
The Step-by-Step Training Guide: From First Sip to Trail Pro
Patience and positivity are your best friends during this process. Keep sessions short (5-10 minutes) and always end on a high note. The goal is for your dog to see the hydration hose as a wonderful water-and-treat dispenser!
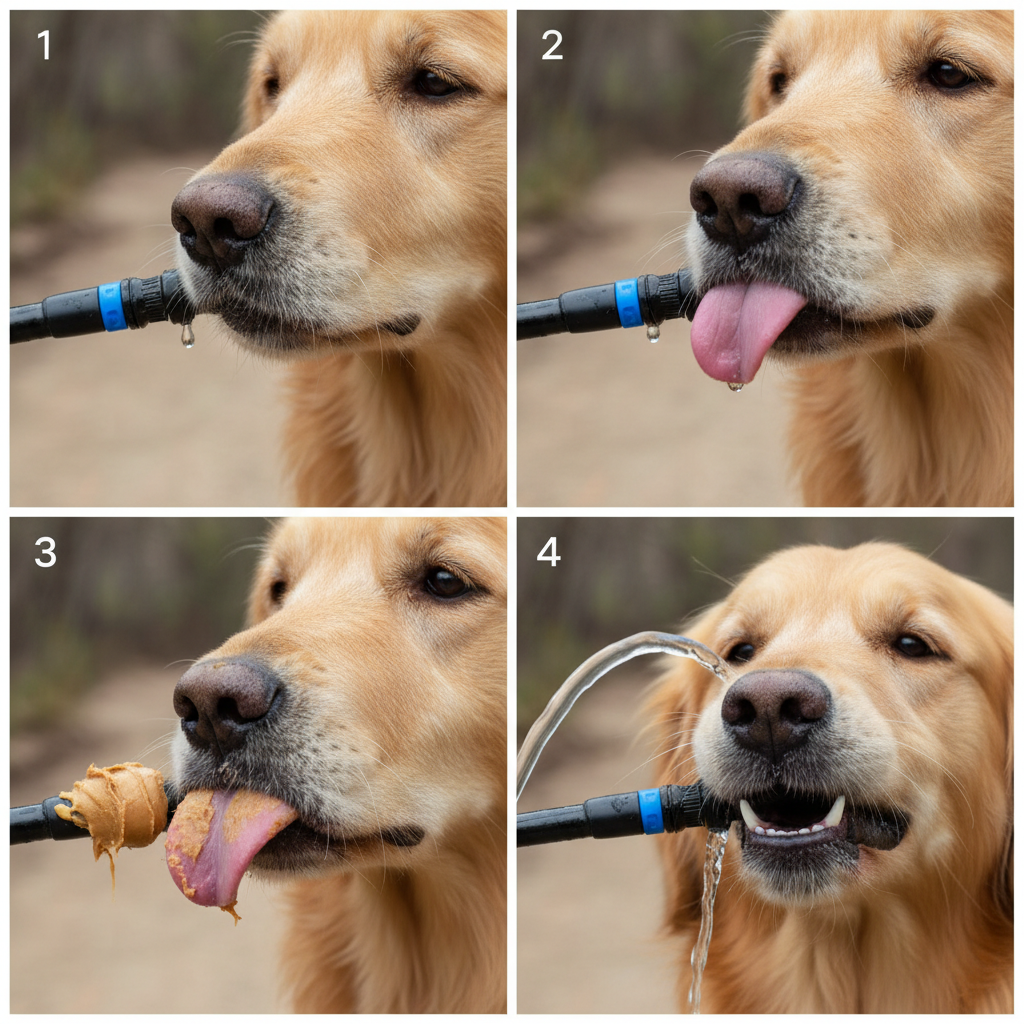
Step 1: Introduce the Hose (No Water)
First, we need to make sure the hose itself isn’t scary. Let the bladder sit on the floor and simply let your dog investigate it. When they sniff the hose or bite valve, click (or say “Yes!”) and give them a treat. Do this a few times until they are happily nudging the hose, associating it with a reward. Don’t introduce water yet; this step is all about building positive association with the object itself.
Step 2: Just a Drop
Now, let’s add a little water. Hold the hose and squeeze the bite valve yourself to let a single drop of water form on the end. Present it to your dog. When they lick the drop of water off, click/praise and reward with a treat. Repeat this several times. They are learning that this plastic thing can provide water.
Step 3: Create a Stream
Once your dog is comfortable licking drops off the valve, up the ante. Squeeze the valve to create a very small, gentle stream of water. Hold it below their mouth and let them drink from the stream. Let them drink for a couple of seconds, then stop the stream, click/praise, and treat. We’re teaching them that drinking from this stream is a highly rewarding activity.
Step 4: The ‘Lure’ to Teach the Bite
This is the most important step. Your dog needs to learn that their own action of biting the valve makes the water come out. To teach this, smear a tiny dab of peanut butter or cream cheese directly onto the end of the bite valve. Present it to your dog. As they lick and nibble at the tasty stuff, they will inevitably press on the valve, and water will flow! The moment this happens, praise them like they just won the lottery. The lightbulb will go on: “When I bite this thing, I get water AND a treat!”
Step 5: Fade the Lure and Add a Cue
After a few successful repetitions with the food lure, try it without. Hold the hose up to your dog and say a verbal cue like “Get a drink” or “Water.” If they hesitate, you can tap the valve to remind them what it’s for. The second they bite or nudge it and get water, praise them enthusiastically. You can now start phasing out the treat for every single success, switching to intermittent rewards and lots of verbal praise.
Step 6: Take it on the Road
Once your dog reliably drinks from the hose indoors, it’s time to practice in new environments. Start in your backyard. Then try it on a quiet neighborhood walk. Finally, take it to the trail! The first few times on a real hike, you may need to remind them, but soon it will become second nature. Congratulations, you have a trail-savvy, hydrated hiking partner!
Troubleshooting: When Your Pup Isn’t Getting It
Don’t worry if your dog doesn’t become a hydration pack pro overnight. Every dog learns differently, and it’s common to hit a few snags. Here’s how to handle some common sticking points.
Problem: “My dog is scared of the hose!”
Solution: This usually happens if you move too fast. Go all the way back to Step 1. Put the hose on the ground and don’t even touch it. Use your highest-value treats to reward any interaction, even just looking at it from a distance. Slowly work your way closer. This may take several short sessions. The key is to build confidence and show them it’s a fun, safe object.
Problem: “My dog will lick the water, but won’t bite the valve.”
Solution: This is a super common hurdle. The concept of biting something to get a drink is unnatural. Revisit Step 4 and be patient. Make the lure (peanut butter, etc.) extra tasty. You can also try gently tapping the valve against their teeth while you hold it to their mouth to show them what to do. Another trick is to use a slightly softer bite valve if your pack has interchangeable options, as some can be quite firm.
Problem: “My dog gets too excited and chews the hose like a toy.”
Solution: It’s important to teach that the hose is a tool, not a chew toy. If your dog starts chewing aggressively, say a calm “Nope,” and briefly take the hose away. Wait a few seconds, then present it again. Only reward gentle mouthing or biting on the valve itself. Keep the hose out of reach when not in use for a drink to avoid them treating it like a toy.
Remember: The golden rule of dog training is to always end on a positive note. If you’re getting frustrated, or your dog is, just end the session with an easy win (like just sniffing the hose for a treat) and try again later. Keeping it fun is the secret to success!
Keeping it Clean and Safe: Hydration Pack Hygiene
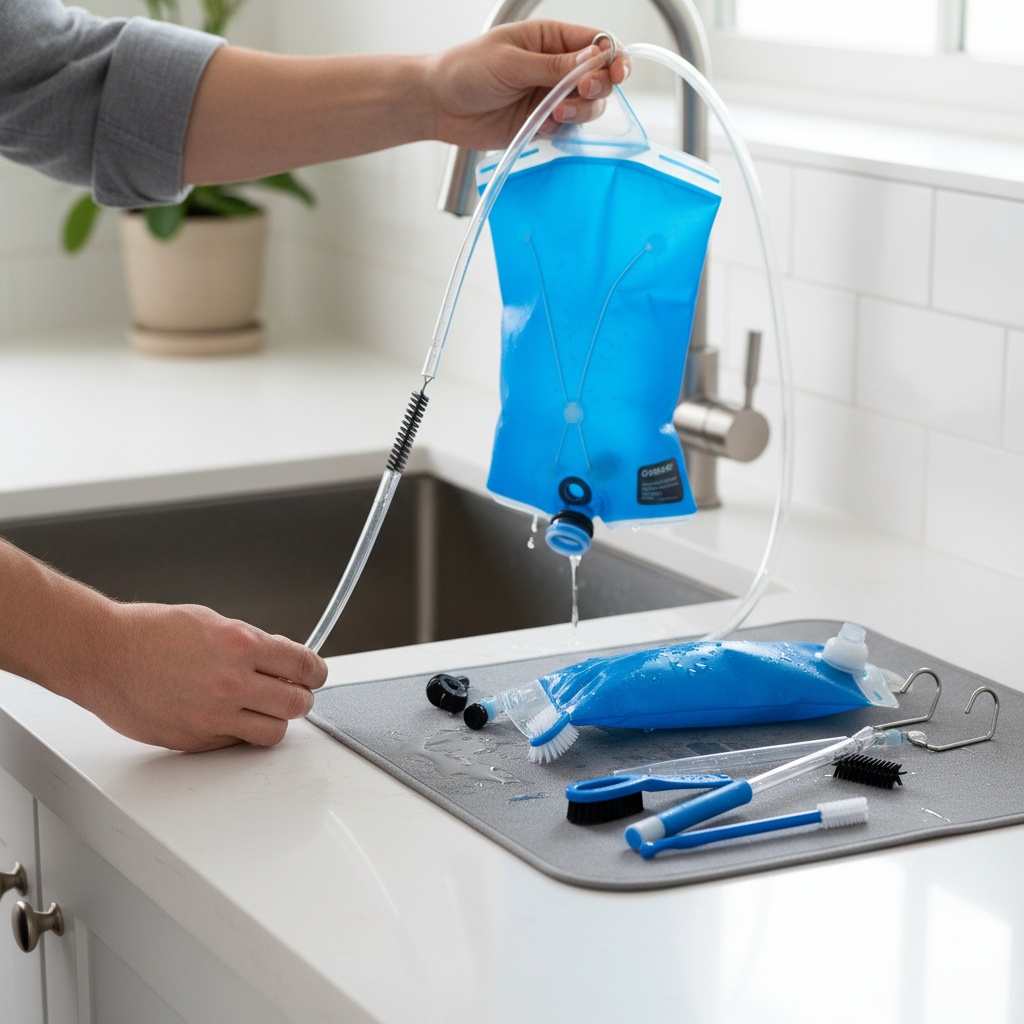
Now that your dog is sharing your water source, hygiene becomes extra important. A dirty bladder or hose can harbor bacteria and mold, which is unhealthy for both of you. Here’s how to keep your gear clean, fresh, and safe.
Regular Cleaning is Non-Negotiable
After every single hike where your dog drinks from the hose, you should clean it. Dog saliva contains a lot of bacteria that can multiply quickly in a dark, damp tube.
- Rinse and Scrub: Empty the bladder and rinse it with hot water. Use a specialized hydration pack cleaning kit, which includes a long, flexible brush for the hose and a larger brush for the bladder itself. Scrub the inside of both thoroughly with mild, unscented soap.
- Sanitize: For a deeper clean, use cleaning tablets designed for hydration bladders or a solution of water and a small amount of bleach or white vinegar. Let it soak according to the product directions, then rinse thoroughly.
- Dry Completely: This is the most critical step to prevent mold growth. Hang the bladder upside down to dry, and use a bladder hanger or a whisk to prop it open for better air circulation. Make sure the hose is also hung to drain and dry completely before storing.
Consider a Dedicated ‘Dog Bladder’
If you hike frequently or are concerned about sharing, a simple solution is to have two bladders. You can have one for yourself and one dedicated just for your dog. They are easy to swap out of your pack, and it ensures there’s no cross-contamination.
Inspect the Bite Valve Regularly
Your dog’s teeth are much sharper than yours. Regularly inspect the silicone bite valve for any punctures or tears. A damaged valve can leak or break off, posing a potential choking hazard. Thankfully, most manufacturers sell inexpensive replacement valves that are easy to pop on.
Conclusion
Congratulations! You’re now equipped with the knowledge to teach your dog one of the most useful skills for any trail-loving duo. Teaching your dog to drink from a hydration pack is more than just a neat trick; it’s about making your adventures smoother, safer, and more enjoyable. It means more time soaking in the views and less time fumbling with gear.
Remember to be patient, stay positive, and celebrate the small victories along the way. Before you know it, you and your pup will be a seamless, well-hydrated hiking team, ready to take on any trail that comes your way. Now, grab your pack, call your dog, and get ready for your next, more convenient adventure!